Update If you want a secure version of this cluster, see Running a Secure RabbitMQ Cluster in Nomad.
RabbitMQ is the centre of a lot of micros service architectures, and while you can cluster it manually, it is a lot easier to use some of the auto clustering plugins, such as AWS (EC2), Consul, Etcd, or Kubernetes. As I like to use Nomad for container orchestration, I thought it would be a good idea to show how to cluster RabbitMQ when it is running in a Docker container, on an unknown host (i.e. one picked by Nomad.)
I ran into a few problems trying to get this working, but a lot of searching and some help from the RabbitMQ mailing list (thanks Luke!) got me through all the issues, so hopefully, this will be easier next time and for other people too.
It is also worth noting that this is only going to be covering how to make a cluster work, not how to make it secure (setting up TLS etc.) for production usage. There is a lot of documentation on the RabbitMQ website for further reading on this!
The full repository with all of the demo code is available on my Github.
Nomad Cluster
As this post is mostly about running RabbitMQ on Nomad, and not setting up Nomad, I’ll give the basics here - the full scripts are in the repository, and linked below too.
Vagrant is used to create us a three node cluster. As I use Hyper-V for VMs, I can’t set static IPs from the Vagrant file, so I have used another Vagrant feature: triggers.
Triggers let us specify scripts to run after Vagrant actions, so in this case, we run a script after machine1 comes up which writes out it’s IP to the /vagrant share. The other machines can then read this same file to join the cluster:
Vagrant.configure(2) do |config|
  config.vm.box = "bento/ubuntu-16.04"

  config.vm.provision "shell", path: "./provision.sh", privileged: false

  config.vm.define "n1" do |n1|
    n1.vm.provision "shell", path: "./server.sh", privileged: false

    n1.trigger.after :up do |trigger|
      trigger.run_remote = { inline: "ip route get 1 | awk '{print $NF;exit}' > /vagrant/server_ip" }
    end
  end

  config.vm.define "n2" do |n2|
    n2.vm.hostname = "nomad2"
    n2.vm.provision "shell", path: "./client.sh", privileged: false
  end
end
The provision.sh script downloads and installs both Consul and Nomad, and then the respective server.sh and client.sh scripts set up both services in the right ways. The server machine also acts as a Nomad client, so that we don’t need 4 VMs running.
VagrantFile, provision.sh, server.sh, client.sh
All that remains to be done is vagrant up…and wait. But while we’re waiting for the machines to provision, let’s have a look at RabbitMQ clustering, and how we’ll define the job in Nomad.
RabbitMQ Cluster
A few things to note about clustering RabbitMQ:
- All nodes must be listening on the same port for clustering (
4369by default) - The
ERL_EPMD_PORTvariable doesn’t work onrabbitmq < 3.7.9 - The latest Docker image for rabbitmq is
3.7.8 - The rabbit node names must be DNS resolvable
- The
RABBITMQ_ERLANG_COOKIEmust have the same value
The rabbitmq_peer_discovery_consul plugin we will use is shipped with RabbitMQ by default but is disabled. The easiest way to get everything up and running is to create your own docker container, with the plugin enabled, and a small configuration file to set a few options:
FROM rabbitmq:management-alpine
COPY rabbitmq.conf /etc/rabbitmq
RUN rabbitmq-plugins enable --offline rabbitmq_peer_discovery_consul
The rabbitmq.conf only needs a few lines:
cluster_formation.peer_discovery_backend = rabbit_peer_discovery_consul
cluster_formation.consul.svc_addr_auto = true
docker build -t rabbitmq:consul .
An image built from this is also available on docker hub.
Once we have a custom container built, it’s a good idea to test that it actually works, before we start trying to get Nomad to run it. We’ll do this by creating a network in Docker so that all the containers can talk directly to each other on their pre-defined ports. Don’t forget to change CONSUL_HOST to your machine’s IP address!
docker network create rabbit
docker run -d --rm --name consul -p 8500:8500 consul

docker run -d --rm --name rabbit1 -h rabbit1 --network rabbit -p 30001:15672 -e RABBITMQ_ERLANG_COOKIE='rabbit' -e 'RABBITMQ_DEFAULT_USER=test' -e 'RABBITMQ_DEFAULT_PASS=test' -e CONSUL_HOST='10.0.75.1' rabbitmq:consul
docker run -d --rm --name rabbit2 -h rabbit2 --network rabbit -p 30002:15672 -e RABBITMQ_ERLANG_COOKIE='rabbit' -e 'RABBITMQ_DEFAULT_USER=test' -e 'RABBITMQ_DEFAULT_PASS=test' -e CONSUL_HOST='10.0.75.1' rabbitmq:consul
docker run -d --rm --name rabbit3 -h rabbit3 --network rabbit -p 30003:15672 -e RABBITMQ_ERLANG_COOKIE='rabbit' -e 'RABBITMQ_DEFAULT_USER=test' -e 'RABBITMQ_DEFAULT_PASS=test' -e CONSUL_HOST='10.0.75.1' rabbitmq:consul
You can now visit http://localhost:30001 (or 30002 or 30003) and see that we have a successful cluster running. Once you’re happy with it, you can kill it all off (as we started the containers with the --rm flag, Docker will delete them for us when they stop):
docker stop rabbit1 rabbit2 rabbit3 consul
docker network rm rabbit
Nomad Rabbit Job
Now that we know our container clusters successfully, we can create a Job definition to do the same thing in Nomad. Nomad jobs are defined in HCL, a Json-like configuration language.
The jobs require a name, which datacentre it should run in, and what kind of job type it is. In this case, our job is called rabbit (imaginative I know), we’ll run it in dc1 (the default value Nomad starts with), and we’ll make this job be a service, as opposed to a batch or system job:
job "rabbit" {

  datacenters = ["dc1"]
  type = "service"

  group "cluster" {
    # tasks ...
  }
}
The group is used to hold a collection of tasks, and when allocating a job, Nomad will make sure that all tasks belonging to an instance of a group are on the same node.
So for example, if you had a 2 node Nomad cluster, and 3 instances of a group which contained 3 tasks (e.g. API, varnish, and nginx containers), Nomad might distribute the groups like so:
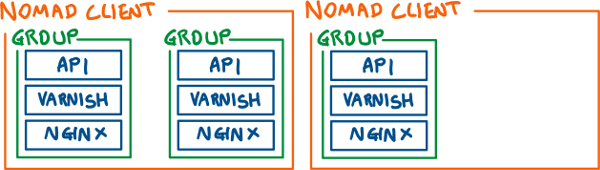
Within the group, we can specify the number of instances we want with the count property, and we also specify that for both updates and migrations, only one group can be changed at a time. This means that if you decide to upgrade the container used by the job, Nomad won’t stop all instances at once, destroying your service’s availability!
We also specify that we want to use the health checks (defined later on) rather than the state of the task itself to determine what is healthy, and how long the task must be healthy for before we decide it’s actually healthy, and how long it has to achieve being healthy.
group "cluster" {
  count = 3

  update {
    max_parallel = 1
  }

  migrate {
    max_parallel = 1
    health_check = "checks"
    min_healthy_time = "5s"
    healthy_deadline = "30s"
  }
}
The task is our unit of work in Nomad. In this case, we are using the docker driver, but it also supports many other drivers including exec, rkt and lxc. We configure which image to use, and importantly that the hostname is the name from Nomad!
The port_map tells nomad which ports of the container we want to expose, and labels them. We can then refer to the ports by their labels in other parts of the configuration.
task "rabbit" {
  driver = "docker"

  config {
    image = "pondidum/rabbitmq:consul"
    hostname = "${attr.unique.hostname}"
    port_map {
      amqp = 5672
      ui = 15672
      epmd = 4369
      clustering =
    }
  }
}
The env section is pretty self-explanatory; they are environment variables to pass to the container. As Consul is running on the Nomad host, we use the Nomad interpolation attribute to specify the IP of the current host, and we also set the RABBITMQ_ERLANG_COOKIE to a specific value. In a production environment, you should be setting this value to something unguessable, possibly using the Vault intergration in Nomad to fetch a token. We can also add other settings to pass to the container here, such as RABBITMQ_DEFAULT_USER and RABBITMQ_DEFAULT_PASS. As with the cookie generation, in a production-like environment, you’d probably want to use the Vault integration to pull the values for these variables.
env {
  RABBITMQ_ERLANG_COOKIE = "rabbitmq"
  CONSUL_HOST = "${attr.unique.network.ip-address}"
}
The resources section lets us constraints on things like CPU, Memory, IOPs, and Network. In our case, we are only specifying a set of ports to expose on the network, and that we want them to be bound to specific ports on the host:
resources {
  network {
    port "amqp" { static = 5672 }
    port "ui" { static = 15672 }
    port "epmd" { static = 4369 }
    port "clustering" { static = 25672 }
  }
}
We could select different ports to bind the container ports to, or leave out the static pair entirely to have Nomad map the ports to random unused ports on the host.
Finally, the service block integrates with service discovery (so, Consul), and allows us to register ports and health checks for our service. In the case of our RabbitMQ cluster, we already have service discovery integration via the RabbitMQ Consul plugin, so this registration is only used for the check feature, which is what will also be used by the migrate block to see if a task is healthy:
service {
  check {
    name     = "alive"
    type     = "tcp"
    port     = "ui"
    interval = "10s"
    timeout  = "2s"
  }
}
The check is using the ui port defined earlier to check if the UI is alive. We could also change the health check to use the amqp port instead, as that might be a better indication that the actual service can do useful things. We can define multiple checks, and are not limited to TCP; grpc, http, and script are also supported.
The entire job definition is below, and is also available in the repository.
job "rabbit" {

  datacenters = ["dc1"]
  type = "service"

  group "cluster" {
    count = 3

    update {
      max_parallel = 1
    }

    migrate {
      max_parallel = 1
      health_check = "checks"
      min_healthy_time = "5s"
      healthy_deadline = "30s"
    }

    task "rabbit" {
      driver = "docker"

      config {
        image = "pondidum/rabbitmq:consul"
        hostname = "${attr.unique.hostname}"
        port_map {
          amqp = 5672
          ui = 15672
          epmd = 4369
          clustering = 25672
        }
      }

      env {
        RABBITMQ_ERLANG_COOKIE = "generate_a_guid_-_or_something_for_this"
        RABBITMQ_DEFAULT_USER = "test"
        RABBITMQ_DEFAULT_PASS = "test"
        CONSUL_HOST = "${attr.unique.network.ip-address}"
      }

      resources {
        network {
          port "amqp" { static = 5672 }
          port "ui" { static = 15672 }
          port "epmd" { static = 4369 }
          port "clustering" { static = 25672 }
        }
      }

      service {
        name = "rabbitmq"
        port = "ui"
        check {
          name     = "alive"
          type     = "tcp"
          interval = "10s"
          timeout  = "2s"
        }
      }

    }
  }
}
Running The Job
First, make sure your console can talk to Nomad, which we can do by using the server_ip file again:
export NOMAD_ADDR="http://$(cat server_ip):4646"
Now it should be possible to run the job:
nomad job run rabbit/rabbit.nomad
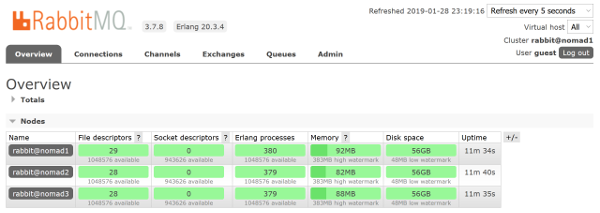
After a few moments, we can visit any of the Nomad hosts, and log in to the RabbitMQ UI (http://SOME_SERVER_IP:15672) and you should be greeted with a running cluster with three nodes:
Homework
- Kill a container on one of the nodes and see what happens (
vagrant ssh n2thendocker stop <SOME_CONTAINER_ID>) - Create an Application which you deploy to Nomad which uses service discovery to talk to RabbitMQ
- Create some more Nomad clients, and try making a bigger RabbitMQ cluster
If you have any questions, feel free to comment below or send me a tweet.