I think Vault by Hashicorp is a great product - I particularly love how you can do dynamic secret generation (e.g for database connections). But how do you validate that the application requesting the secret is allowed to perform that action? How do you know it’s not someone or something impersonating your application?
While musing this at an airport the other day, my colleague Patrik sent me a link to a StackOverflow post about this very question
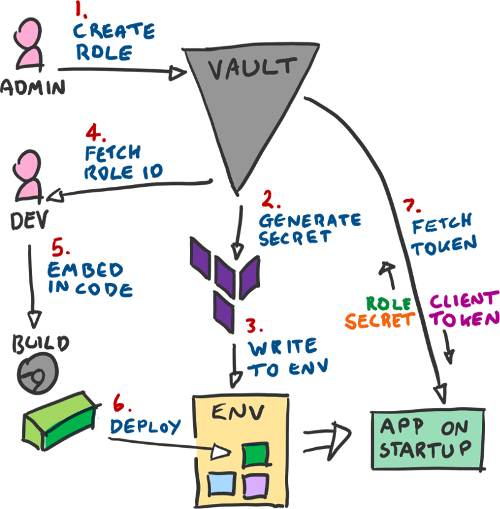
The summary is this:
- Use an AppRole rather than a plain token
- Bake the RoleID into your application
- Provide a SecretID from the environment
- Combine both to get a token from Vault on startup
- Periodically renew said token.
Or, in picture form:
So let’s see how we can go about doing this.
0. Setup Vault
This time we will use Vault in dev mode, which means that it starts unsealed, and we can specify the root token as something simple. On the downside, there is no persistence; restarting the container gives you a blank slate. If you would prefer to use Vault with persistent storage, see Section 2 of the previous post:
docker run \
    -d --rm \
    --name vault_demo \
    --cap-add=IPC_LOCK \
    -e VAULT_DEV_ROOT_TOKEN_ID=vault \
    -p 8200:8200 \
    vault
As in the previous article, we’ll export the VAULT_TOKEN and VAULT_ADDR variables so we can use the Vault CLI:
export VAULT_ADDR="http://localhost:8200"
export VAULT_TOKEN="vault"
For our last setup step, we need to enable the AppRole auth method:
vault auth enable approle
1. Create A Role
Creating a role has many parameters you can specify, but for our demo_app role, we are going to skip most of them, just providing token_ttl and token_max_ttl.
vault write auth/approle/role/demo_app \
    token_ttl=20m \
    token_max_ttl=1h
2. Request A Secret ID
Vault has two modes of working, called Push and Pull. Push mode is when you generate the secret_id yourself and store it against the role. Pull mode is when you request Vault to generate the secret_id against the role and return it to you. I favour the Pull model, as it is one less thing to worry about (how to generate a secure secret_id.)
We have to specify the -force (shorthand -f) as we are writing a secret which has no key-value pairs, and as we are using the CLI, I have specified -field=secret_id which changes the command to only output the secret_id’s value, rather than the whole object.
export SECRET_ID=$(vault write -f -field=secret_id auth/approle/role/demo_app/secret-id)

echo $SECRET_ID
#> 119439b3-4eec-5e5b-ce85-c1d00f046234
3. Write Secret ID to Environment
This step would be done by another process, such as Terraform when provisioning your environment, or Spinnaker when deploying your containers.
As we are just using the CLI, we can pretend that $SECRET_ID represents the value stored in the environment.
4. Fetch Role ID
Next, assuming the role of the developer writing an app, we need fetch the role_id, for our demo_app role. As with fetching the secret_id, we specify the -field=role_id so we only get that part of the response printed:
vault read -field=role_id auth/approle/role/demo_app/role-id
#> 723d66af-3ddd-91c0-7b35-1ee51a30c5b8
5. Embed Role ID in Code
We’re on the CLI, and have saved the role_id into the $ROLE_ID variable, so nothing more to do here!
Let’s create a simple C# Console app to demo this with:
dotnet new console --name VaultDemo
dotnet new sln --name VaultDemo
dotnet sln add VaultDemo/VaultDemo.csproj
dotnet add VaultDemo/VaultDemo.csproj package VaultSharp
We also installed the VaultSharp NuGet package, which takes care of doing the client token fetching for you - but we will go through what this is doing internally later!
class Program
{
  private const string RoleID = "723d66af-3ddd-91c0-7b35-1ee51a30c5b8";

  static async Task Main(string[] args)
  {
    var auth = new AppRoleAuthenticationInfo(
      RoleID,
      Environment.GetEnvironmentVariable("SECRET_ID")
    );

    var client = VaultClientFactory.CreateVaultClient(
      new Uri("http://localhost:8200"),
      auth
    );

    await client.CubbyholeWriteSecretAsync("test/path", new Dictionary<string, object>
    {
      { "Name", "I'm a secret Name!" }
    });

    var secrets = await client.CubbyholeReadSecretAsync("test/path");
    Console.WriteLine(secrets.Data["Name"]);
  }
}
6. Deploy!
As we’re running locally, nothing to do here, but if you want, imagine that you created a docker container or baked an AMI and deployed it to the cloud or something!
7. Run / On Start
As we’ve already saved the SECRET_ID into an environment variable, we can just run the application:
dotnet run --project VaultDemo/VaultDemo.csproj
#> I'm a secret Name!
So what did the application do?
When run, the application used both the role_id from the constant and the secret_id environment variable to call Vault’s Login method. An equivalent curl command would be this:
curl -X POST \
    --data '{ "role_id":"723d66af-3ddd-91c0-7b35-1ee51a30c5b8", "secret_id":"119439b3-4eec-5e5b-ce85-c1d00f046234" }' \
    http://localhost:8200/v1/auth/approle/login
This will spit out a single line of json, but if you have jq in your path, you can prettify the output by appending | jq .:
{
  "request_id": "37c0e057-6fab-1873-3ec0-affaace26e76",
  "lease_id": "",
  "renewable": false,
  "lease_duration": 0,
  "data": null,
  "wrap_info": null,
  "warnings": null,
  "auth": {
    "client_token": "c14f5806-aff2-61b6-42c2-8920c8049b6c",
    "accessor": "aef3d4f4-d279-bcda-8d9c-2a3de6344975",
    "policies": [
      "default"
    ],
    "metadata": {
      "role_name": "demo_app"
    },
    "lease_duration": 1200,
    "renewable": true,
    "entity_id": "34b1094b-28d4-1fb0-b8f6-73ad28d80332"
  }
}
The line we care about is client_token in the auth section. The value is used to authenticate subsequent requests to Vault.
For instance, in the C# app we used the CubbyHole backend to store a Name. The equivalent curl commands would be:
export VAULT_TOKEN="c14f5806-aff2-61b6-42c2-8920c8049b6c"

# vault write cubbyhole/test/path name="Another manual secret"
curl -X POST \
    --header "X-Vault-Token: $VAULT_TOKEN" \
    --data '{ "Name": "Another manual secret" }' \
    http://localhost:8200/v1/cubbyhole/test/path

# vault list cubbyhole/test/path
curl -X GET \
    --header "X-Vault-Token: $VAULT_TOKEN" \
    http://localhost:8200/v1/cubbyhole/test/path
So why use the client library if it’s just HTTP calls? Simple - by using VaultSharp (or equivalent) we get token auto renewal handled for us, along with working APIs; no more guessing and head-scratching while trying to work out the proper HTTP call to make!
What Next?
Read up on what you can do with Roles - such as limiting token and secret lifetimes, usage counts, etc.
Next article will probably cover Vault’s Policies.